


Prioritize fixing structural components over purchasing new parts. This choice often leads to cost savings and shorter downtime. Specialized techniques allow technicians to restore integrity while preserving the original design.
The utilization of modern tools like heat application and hydraulic presses can seamlessly reshape damaged areas. These methods enhance durability and maintain aesthetic appeal without resorting to full replacement. It’s a smart practice that reflects both budget-conscious decisions and environmental responsibility.
In addition, consider employing experienced professionals who are skilled in the latest restoration techniques. Their expertise ensures that the work meets safety standards and maintains the vehicle’s original quality. Investing in restoration not only protects your vehicle but also contributes to longevity.
Evaluating Damage: When to Repair vs. Replace Body Panels
Assess the extent of the dent or scratch. Minor surface damage can often be restored with techniques like dent pullers or buffing. In contrast, extensive dents or structural compromises may require total substitution.
Check for rust or corrosion. Any signs of decay, especially if they affect the integrity of the material, typically warrant a full change. Treatment of surface rust might be feasible, but deeper issues indicate replacement is necessary.
Consider the age and model of your vehicle. Classic cars often benefit more from restoration than new models. Vintage components are harder to find, making repair a more appealing option for enthusiasts.
- If the vehicle has historical value, restoration is preferred.
- For modern vehicles, weigh the cost of labor against new parts.
Evaluate the cost implications. Repairs often come at a lower initial expense, but consider longevity. Replacement parts may offer better durability, ultimately saving you money on future fixes.
Inspect the alignment of adjacent parts. Mismatched components after a repair can lead to further issues down the line. Full replacements usually ensure uniformity, reducing the likelihood of additional adjustments.
- Assess damage type: surface or structural?
- Check the cost-effectiveness of repair vs. part change.
- Evaluate the skill level required for restoration work.
- Consider the aesthetics: Do you want a perfect matches in color and texture?
Solicit expert opinions. Automotive professionals can provide insight into whether restoration would hold up against future wear and tear compared to new materials.
Make a decision based on how long you intend to keep the vehicle. For a long-term asset, investing in quality replacements may yield better results over time than temporary fixes.
Step-by-Step Guide to Repairing Common Body Panel Issues

Begin with assessing the damage. Identify dents, scratches, or rust spots. For small dents, a hairdryer can be used to heat the area. This can expand the metal and facilitate the removal of minor imperfections.
Next, gather necessary tools: a putty knife, sandpaper (various grits), and primer. For deeper scratches, filling is required. Use a suitable filler material, applying it with a putty knife. Allow it to cure based on manufacturer instructions.
| Tool/Material | Function |
|---|---|
| Putty Knife | Applying filler |
| Sandpaper | Smoothing surfaces |
| Primer | Preparing for paint |
Sand the filled area after it has fully dried. Start with coarse sandpaper to level the surface, then gradually move to finer grits for a smooth finish. This ensures the paint adheres correctly.
Finally, apply primer and paint. Choose a color that matches your vehicle. Spray in thin, even coats, maintaining a consistent distance from the surface. Allow sufficient drying time between each coat for a flawless result.
Tools and Techniques for Successful Body Panel Repairs
Using a high-quality hammer and dolly set is fundamental for reshaping damaged surfaces. Select a body hammer with a flat face for larger dents and a pick hammer for tighter areas. The dolly should match the contour of the surface to facilitate proper shaping and minimize the need for filler later.
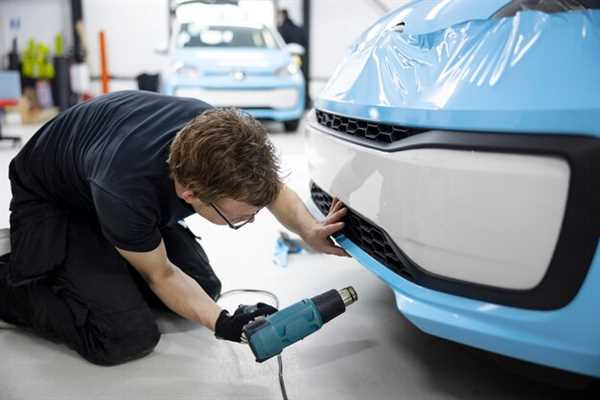
Employ a heat gun to aid in the removal of minor imperfections. Heat softens the metal, making it easier to manipulate. Apply heat evenly across the area and follow up with gentle tapping using a hammer to coax the metal back into its original form. Exercise caution to avoid overheating and causing additional damage.
Utilizing a pulling tool can effectively solve issues with deep creases. This tool applies a pulling force directly to the affected area. Attach the pulling mechanism securely, ensuring a firm grip, and apply slow, steady pressure to bring the metal back into alignment.
Filling gaps might be necessary for minor imperfections. Employ high-quality body filler or putty for this purpose. Mix it according to the manufacturer’s specifications, applying it smoothly to create a seamless surface. Once dried, sand it down to achieve the desired smoothness.
Use a sanding block or a power sander for surface smoothing after application of filler. Start with lower-grit sandpaper to remove excess material, then progress to finer grit for a polished finish. Ensure that the edges blend smoothly with the surrounding area for a professional look.
A proper primer is crucial for ensuring that newly worked areas bond well with paint. Apply a compatible primer to create a suitable surface for paint adhesion. Follow the manufacturer’s instructions for drying times to guarantee a durable finish that withstands the elements.